Download SN Write Tool Latest Version
Do you want to know how to use SN Write Tool step by step? Then you have arrived at the perfect article since. Next, we are going to teach you unconditionally all the information that you have to take into account in this type of situations, information that will undoubtedly be of great use to you. The first thing you have to know is that in the following lines, we are going to show you how to modify the IMEI of your smartphone with the SN Tool program, which is one of the best we can find in this segment.
The truth is that it is an essential tool when we want to modify the IMEI code of our smartphone, so you should not lose sight of the possibility of using this platform if for some reason you have to change the 15-digit code that you identified to your device.
Tutorial of SN Write Tool
Well, let’s go with how to use SN Write Tool step by step. The first thing you have to keep in mind in this kind of situations. When it comes to flashing the IMEI of your smartphone, you have to know that when you finish the procedure. Otherwise, you will be losing the device’s warranty. The truth is that it is a risk that we run in these cases. So, it is better to think twice before acting. You have to know that we cannot take charge in case you run out of warranty for this reason. SN write tool fail.
Requirements
1) Make sure you have the database file of your device since it is required to write the IMEI. If you do not have it, download the firmware of your device and obtain the database file.
2) The device must have at least 50 or 60% battery.
3) Download the USB drivers from your device to the PC. Only by doing this, you can connect your phone to the PC.
Tutorial
Once you have finished all the prerequisites, you can start with the tutorial indicated below.
- To start, download the SN file and then extract it to the desktop of your PC. Now press on “SN Writer.exe” to start the procedure.
- Next, in the SN window go to the Com port option and select in “VCOM USB.”
- Then select the type of device, for that go to IMEI Options and click on Check Sn.
- Next, go to “Setting” and press on Address, Wifi, BT, and IMEI.
- Now go to “IMEI Option” and activate “Dual IMEI” in the lower left.
- Next, in DataBase File press on “MD1_DB” and select the MD1_DB of your device. Follow the same procedure and add the file “AP_DB.” Once this is done, click on the “Save “button.
- Now in the main window of SN Write Tool and click on the “STAR” button to start browsing the data.
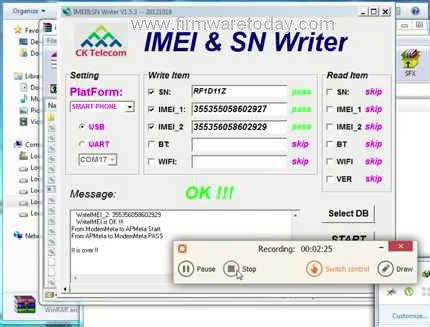
- Next, in the “Scan Data” window, enter IMEI_1, IMEI_2, BT, and Wi-Fi. Once all the data have been entered, click on the “Ok button.”
- Once done, turn off the device and remove the battery (only if you can). Then connect the phone to the PC using the original USB cable. When the device is connected, the IMEI flashing process will start.
- As soon as the IMEI flashing process is complete, a green box with the word “PASS” will appear.
Once you have finished all the previous steps, you have to download the USB drivers on your PC. At that time you can or should connect the device to the computer. We recommend that you take the time necessary to make a backup. Because this way you will make sure that you will not lose any of your important content if something goes wrong. Sn write tool database file
Install SN write tool
To start, download the SN file and extract it directly to your computer’s desktop. After that, click on SN Writer.exe, which is the executable file that will start the procedure in question. Then, in the SN window, you will see that the ComPort option appears and you have to select VCOM USB. Later it is time to select the type of device. For that, you have to go to IMEI Options and press later on Check Sun. Once the device in question has been selected, go to Settings, WiFi, BT, and IMEI.
SN write tool Latest version 2022
sn_write_tool_v1_1752– Latest
Repair IMEI
Then you have to go to IMEI Option and activate Dual IMEI, an option that you will see that appears in the lower left part of the screen. Later you have to go to DataBase File and press on MD1_DB, selecting the option of the same name in MD1_DB. Then you have to add AP_DB, and when you’re done, you have to click on the Save button. You return to the main SN Write Tool window and click on the STAR button to start browsing the data. It’s close to finishing.
Then you have to go to the Scan Data window, entering IMEI_1, IMEI_2, BT, and Wi-Fi. When you have entered all the elements, you have to click on the Ok button. Once you are finished, you have to turn off the device and remove the battery in case it is removable. Then you must connect the phone to the computer using the original USB cable if you have it on hand. When the device is connected, the IMEI flashing will start immediately, and we are about to finish.
Finally,
When the process of SN write tool finishes, the IMEI flashing will be finished. At that time a green box will appear that will carry the word PASS, among others. When you pass that screen, the IMEI will have been modified. You can make any other tutorial that you want, and that would require this change.
Also Might Like........
 Download QTab V11 Allwinner A33 Flash File Free Stock Rom
- Huawei P7-L10 B839 Official Firmware Free 2nd Update 100%Tested
 Tecno 8H flash file firmware Rom
 Walton Primo HM3 flash file firmware Rom
 How to download Oppo customer service tool
 Voice v20 Flash File Free Stock Rom Firmware (MT6572) 1000% Work
![Universal Samsung FRP Bypass Apk Google Account Remove New Method [2024]](https://firmwaretoday.com/wp-content/uploads/2018/06/Universal-Samsung-FRP-Bypass-150x150.jpg) Universal Samsung FRP Bypass Apk Google Account Remove New Method [2024]
Universal Samsung FRP Bypass Apk Google Account Remove New Method [2024] QMobile i12 Official firmware Free 2nd Update (MTK6582) 100%Tested
 Symphony V90 flash file stock Rom firmware

